
 Your piano may be red.
The Piano Switch sits on the corner of your Nexus DR-X board with its four white keys. Each lever is tied to a GPIO pin on your Raspberry Pi and has its own pull up resistor on the PCB. Every time you reboot your Rpi, a script written by Steve, AG7GN, checks the state of the four levers and tries to match them up with a script that may or may not exist in your /home/pi/ directory. If there is a matching script, it is executed.
It is possible to have up to 16 different scripts that you can call with this feature.
It is possible to have up to 16 different scripts that you can call with this feature.
NAMING THE SCRIPTS
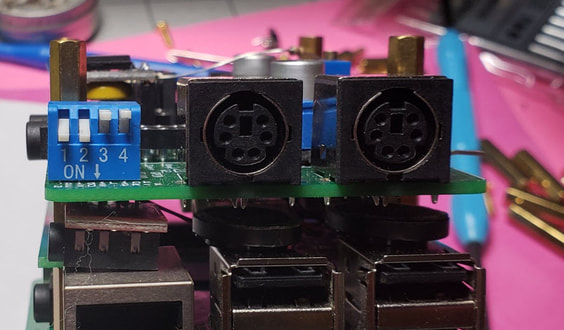
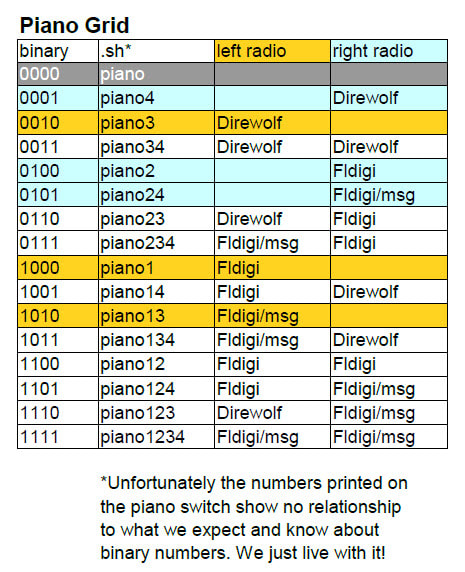
We us a simple system for naming our files. Look at the photo above. Levers 1 and 2 are down or ON. Levers 3 and 4 are up or OFF. If there is an executable shell file at /home/pi/piano12.sh it will automatically launch when the Pi boots up. If the file does not exist, the Pi simply boots up normally. The file name is the word: "piano" followed by the digits with levers pulled down starting with the lowest numbered digit first and working up.
We us a simple system for naming our files. Look at the photo above. Levers 1 and 2 are down or ON. Levers 3 and 4 are up or OFF. If there is an executable shell file at /home/pi/piano12.sh it will automatically launch when the Pi boots up. If the file does not exist, the Pi simply boots up normally. The file name is the word: "piano" followed by the digits with levers pulled down starting with the lowest numbered digit first and working up.
WHAT IF NO LEVERS ARE DOWN
You can program that too. If none of your switches are down we look for a file named simply: paino.sh
and launch it.
You can program that too. If none of your switches are down we look for a file named simply: paino.sh
and launch it.
WHAT IF YOUR EARLY VERSION DOESN'T HAVE A PIANO
You still can have some fun. Even though there is no piano switch on your board, the Rpi thinks it detects an invisible phantom piano with levers 1 and 2 down. At least you can write one script called piano12.sh and auto-launch it.
You still can have some fun. Even though there is no piano switch on your board, the Rpi thinks it detects an invisible phantom piano with levers 1 and 2 down. At least you can write one script called piano12.sh and auto-launch it.
EXAMPLE SCRIPT 1
Let's say that we want to auto-launch Fldigi on the left radio when lever 1 is down.
First, make sure you have latest update of hampi-utilities installed: In the Hamradio menu select 'Update Pi and Ham Apps'. When the updater dialog box opens put a check in the box next to 'hampi-utilities' and click OK.
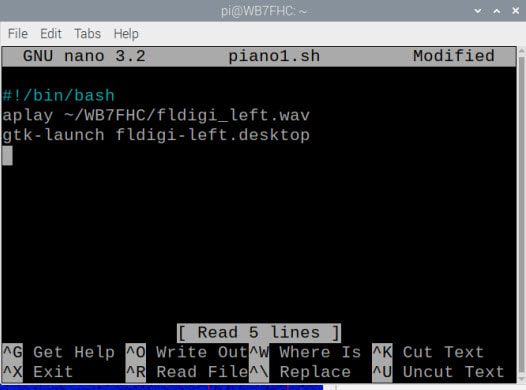
Here is the script:
#!/bin/bash
aplay ~/WB7FHC/fldigi_left.wav
gtk-launch fldigi-left.desktop
The first line is the typical beginning of a shell file.
The second line plays a wave file that announces: "Launching Fldigi on left radio." If your HDMI monitor has speakers you will hear it.
The third line simulates selecting the file from our desktop menu.
Save the file and make it executable by typing:
sudo chmod 755 *.sh
Now set the piano up with only lever 1 down and reboot the Pi. Fldigi should launch on the left radio.
EXAMPLE SCRIPT 2
This time let's launch Direwolf on the right radio when lever 4 is down. Note: the following script will work if ONLY lever 4 is down. We will look at launching two apps at the same time in the next example.
This time let's launch Direwolf on the right radio when lever 4 is down. Note: the following script will work if ONLY lever 4 is down. We will look at launching two apps at the same time in the next example.
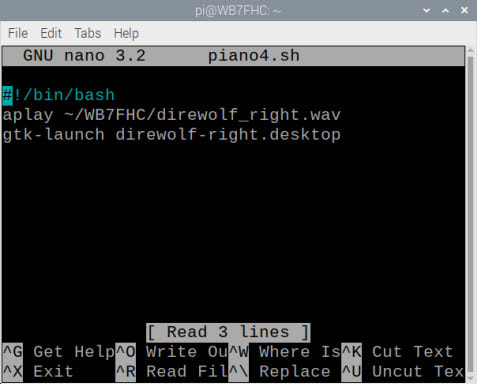
Here is the script:
#!/bin/bash
aplay ~/WB7FHC/direwolf_right.wav
gtk-launch direwolf-right.desktop
Save the file as piano4.sh and make it executable by typing:
sudo chmod 755 *.sh
Push lever 1 back up and pull 4 down. Then reboot.
#!/bin/bash
aplay ~/WB7FHC/direwolf_right.wav
gtk-launch direwolf-right.desktop
Save the file as piano4.sh and make it executable by typing:
sudo chmod 755 *.sh
Push lever 1 back up and pull 4 down. Then reboot.
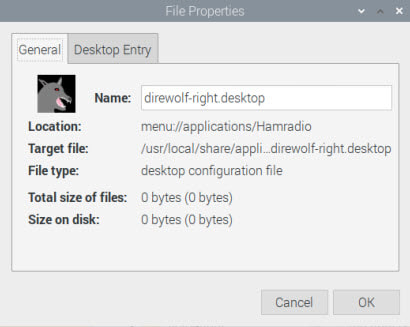
ABOUT GTK-LAUNCH:
gtk-launch launches an application using the name you provide. You will find details here.
How do you know what to launch? That's easy. Find the app that you want in the Hamradio menu. Then right click on it and select 'Properties'. Enter the text in the 'Name' field into your script, exactly as you see it.
USING MORE THAN ONE LEVER
Ok, now say you want to launch both apps at the same time. Let's put Fldigi on the left radio and Direwolf on the right radio. We will use the same two switches.
EXAMPLE SCRIPT 3
This time we name our script: piano14.sh because levers 1 and 4 are down. Of course, we could write all the lines from both of the previous examples into one long script, but we don't have to. We can let this script call our other two. We can cascade the code:
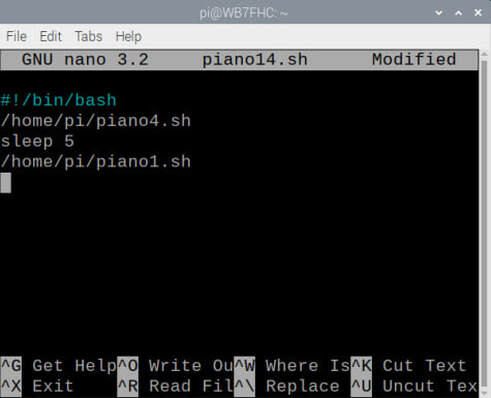
Here is the script:
#!/bin/bash
/home/pi/piano4.sh
sleep 5
/home/pi/piano1.sh
You must use the full path to your shell script in order to call it from another one. I am calling the Direwolf script first because I want Fldigi to appear on top when we are done.
The short pause or sleep is there to keep the two wave files from playing at the same time.
LOTS OF POSSIBILITIES
I have written a complete set of scripts to hand many different combinations. On the left is a grid that shows the scripts that you can find on my Google Drive. They can get you started.
When you download the piano files, store them all at /home/pi/ and then enter:
sudo chmod 755 *.sh
To get the wave files and a couple more handy scripts create a folder at: /home/pi/WB7FHC/ and then put the files in the online WB7FHC folder in it.
Here is another quick link to the files.
Of course these are just a few of the possibilities. You might program your piano to set the SSID number for packet. You could change call signs for different users. You could even write scripts to tell RigControl to make changes to your radio.
ENABLING HDMI SOUND ON YOUR NEXUS DR-X
These scripts use voice announcements when launching their apps. If your HDMI monitor has built in speakers you will need to do the following to enable the sound.
These scripts use voice announcements when launching their apps. If your HDMI monitor has built in speakers you will need to do the following to enable the sound.
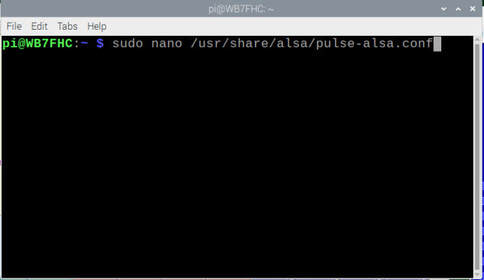
Open a terminal window using the ">_" icon in your menu bar. Then enter the following line:
sudo nano /usr/share/alsa/pulse-alsa.conf
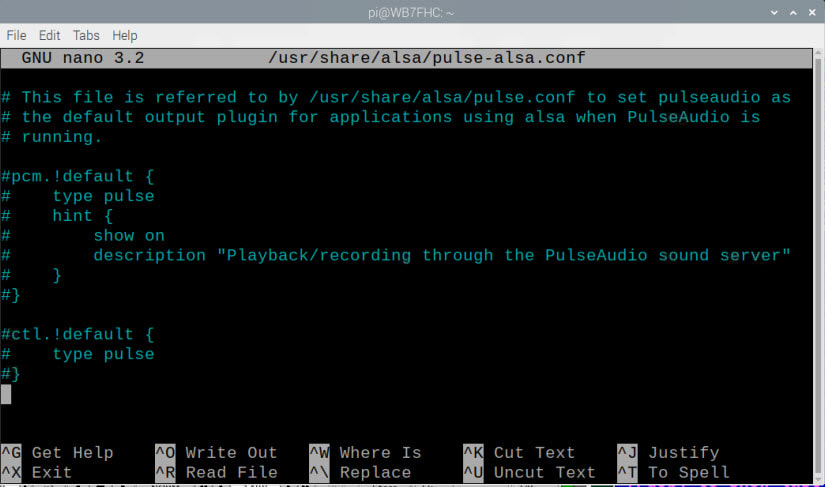
When the editor opens, comment out every active line by putting a '#' at the beginning. When you are done, every line should have a '#' in front of it.
Save the file with: ctrl-x, Y, [Enter] Then reboot your Pi.
Save the file with: ctrl-x, Y, [Enter] Then reboot your Pi.
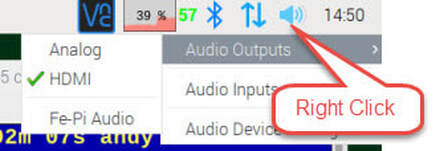
After it reboots, Right Click on the speaker icon in the top right corner of your screen and select Audio Outputs and slide over to check HDMI. A regular click on the speaker icon will let you adjust the volume.